 Use our Projection Mapper software for drawing maps quickly and easily! This application allows you to draw clear to the edges of your screen without any tool bars to get in the way.
We have a version available for Windows (Vista or newer), Apple Macintosh computers (El Capitan or newer) and Linux (Debian, Ubuntu, Chromebook OS, Raspberry Pi).
Click here to download the Windows version.
Click here to download the Mac version. (Important Note: Our Mac software is not registered with Apple and may require a change to the security settings on your Mac in order to run. See the installation instructions below.)
Click here to download the Linux Version (For Debian, Ubuntu, Chromebook OS)
Click here to download the Linux Version for Raspberry Pi (For mini computers with ARM64 architecture)
Why Is It Free?
Projection Mapper does not display any ads or try to install any trial software, etc. We want to make drawing a map as easy as possible for our customers so that they can purchase our services. We make money indirectly from the use of the software by our customers and that is enough for us.
Windows Installation
- Download the application setup file.
- When prompted, select to run the program. At this point your computer may give you a warning about the installation. Click to proceed.
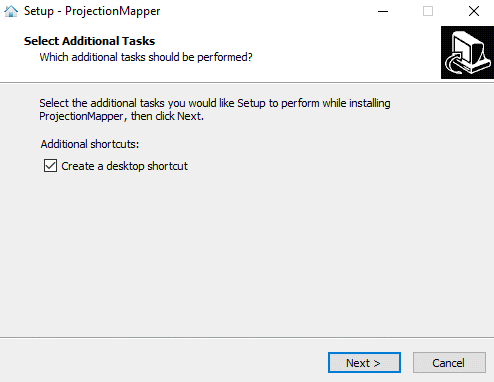
- The installation wizard will launch and give you options for installing the program. Typically you will want to just leave the settings the way they are. Make sure the box is checked to create a desktop icon so you can have easy access to the program. Follow the prompts to complete installation.
- Once the program is installed, it is a good idea to check the computer display settings just in case the defaults don’t work for you. Follow the steps below to set optimal display settings on your PC:
- First, connect your projector to your computer and make sure the projector aspect ratio is set to 16:9. (consult your projector manual for information about how to do that)
- Click the Windows “Start” icon on your task bar
- Click the “Settings” icon from the pop up menu.
- Click “System”.
- Look for the “Display Resolution” setting on the resulting page. Select “1920 x 1080”. If it is not available select “1366 x 768” or “1280 x 720”.
- Make sure the “Scale” is set to 100%
- Under “Multiple Displays” you will want to make sure “Duplicate” is selected. That will ensure that your computer and the projector are displaying the same thing
Mac Installation
By default, Mac computers have security settings in place that will only allow software from the Apple App Store to be downloaded and run. Since our software is not available in the App store, you will need to specifically authorize our software to run in your computer’s security settings. Follow the procedures below:
- Download the zipped application file and navigate to the folder where you saved it.
- Click on the zip file to extract the program. A new program file icon will appear next to the zip file.
- Click on the program file icon to launch it. If you get a security warning and the software does not open, follow the steps below:
- Click the Apple icon in the upper left corner of your screen
- Select “System Preferences”
- Click “Security & Privacy”
- Toward the bottom of the resulting pane you will see a message similar to: “ProjectionMapper was blocked from opening because it is not from an identified developer.”
- Click the “Open Anyway” button to authorize opening the program. Once you do this, you will be able to use the software at any time without having to change any more settings.
- Once the program launches the entire screen will turn white with no buttons or toolbars. Exit the program by right clicking anywhere on the screen and selecting “Exit” from the drop down menu.
- MacBook computers typically do not have a 16:9 screen resolution by default. You will want to change the screen resolution to match a standard video frame. To do that follow the instructions below:
- First, connect your projector to your computer and make sure the projector aspect ratio is set to 16:9. (consult your projector manual for information about how to do that)
- On your Mac, choose the Apple menu > System Settings, then click Displays in the sidebar. (You may need to scroll down.) Then select Resolution
- Choose 1920 x 1080. If it is not available select 1280 x 720.
Linux Installation
Installing software on Linux computers will vary depending on the flavor of Linux you are running. We provide our mapping software as a .DEB file, which is a very common format for Linux software installation. If you aren’t familiar with how to install a .DEB file on your computer, you will need to research that. Also, be aware that our Linux software is graphical in nature, so it will only work on machines running a graphical interface such as GNOME, XFCE, MATE, etc.
Chromebook installation can be a little more complicated, but follow this link for an excellent article about how to install and run Linux software on Chromebook OS.
Once you have installed the software, you want to make sure your computer screen resolution is set to one with a 16:9 aspect ratio. “1920 x 1080” is ideal since that is the resolution at which we provide the videos, but “1366 x 768” or “1280 x 720” will also work. You will also want to set your projector aspect ratio to 16:9. Your projector manual will give you instructions on how to do that.
The Linux version of the mapping software is virtually identical to the Windows and Mac versions, so the instructions for how to use the software below will apply just the same.
Using The Program
- To launch the program, double click on the Projection Mapper icon on your desktop or wherever the program is located.
- When the program starts your entire screen will turn white. This is your canvas for drawing your map. In the Windows version, vertical and horizontal ruler lines are there to help you find your mouse pointer and you will see that the lines move with your pointer.
- To begin drawing, left click and hold anywhere on the screen. Drag the mouse pointer and the program will draw a straight line for you between the original click point and the current location of the mouse pointer. Once the line looks the way you want it, release the mouse button. Repeat the process to draw as many lines as you need to draw your map.
- To simulate curves, simply draw a series of short lines.
- If you make a mistake, right click anywhere on the screen and select “Undo” from the drop down menu and the previously drawn line will disappear. Do it again and the one before that will disappear.
- To save your map drawing, right click anywhere on the screen and select “Save” from the drop down menu. A file save dialog box will open so that you can save your map.
- To exit the program right click anywhere on the screen and select “Exit”.