If you want to mount your projector securely so you don’t have to constantly watch it, then you will need to build some kind of secure box to protect it from weather and potential thieves. There is certainly more than one way to go about it, but this is a tutorial showing you how I built mine. I project in all kinds of weather, including rain and snow storms and my projector is still going strong. Also I have never had anyone attempt to steal it.
This box will fit any projector up to 17″ wide. If yours is larger, you will need a bigger box.
Materials:
- One 4′ x 8′ sheet of 1/2″ thick plywood
It doesn’t have to be pretty, just something sturdy - One 8′ 2 x 2 board
Look for one that is as straight as possible as this is for reinforcement - 2 hinges
I prefer these partial wrap inset cabinet hinges - 2 handles
Make sure these are relatively large and easy to grip because the box is heavy. I like these. - A sturdy latch
This will allow you to lock up the box and will also keep the door closed. I prefer this double hinge hasp. - 3 rubber feet (furniture feet)
Not absolutely required, but they help the box sit evenly on hard surfaces and keep it from sliding. If you use 3 the box will never rock. - A supply of 1 1/4″ wood deck screws
This type won’t rust in the weather and are small enough that you don’t need to pre-drill holes to avoid cracking the wood - Door & Window type caulk
This is to seal the seams to keep water out - Exterior house paint
This will seal and protect the plywood from the weather. Any color will do, but black is probably best to make it unobtrusive at night. - Locks
For locking the box and securing it in place. I use 2 simple padlocks. One for locking the door latch and another for securing the box to an earth anchor. - Earth Anchor (optional)
If you don’t have something to secure the box to, then an earth anchor can provide that for you.
Instructions:
The first step is to cut the pieces you will need out of the sheet of plywood. The diagram below illustrates how it should be done and the measurements.
In addition you need to cut four 18″ lengths from the 2 x 2 board and two 12″ lengths.
At this point you will want to draw guide lines for your shelf supports on the side pieces. Typically you want to angle your shelf down to compensate for the throw angle of the projector. Mark the edges of the side pieces at 7″ and 11″ and draw a line between the marks with a ruler. These lines should be seen on the inside of the box when you assemble the pieces.
To assemble the box, take one of the side pieces of plywood and screw one of the 18″ 2 x 2s along one of the edges of it so that it is flush. Screw another of the 2 x 2s to the other edge. Repeat with the other side piece of plywood. Align the side pieces on the edges of the top and bottom pieces and screw them together. The top and bottom pieces are longer, so center the side pieces so that there is an extra 1/2″ of overhang on the front and the back. When you are done, it should look like the diagram below.

Next, screw on the front piece. It should slide into the 1/2″ overhangs of the top and bottom pieces and appear flush. Screw into the ends of the 2 x 2 supports in each corner to make it sturdy.
The 12″ pieces of 2×2 are your shelf supports. They need to be installed inside the box lined up with the lines you drew previously. It isn’t critical, but I usually install the shelf supports about 1″ from the front of the box. I like to leave a space for air circulation. Hold a shelf support in place with one hand while you drive a screw into the box from the outside to secure it. Use two screws so it won’t turn. Optionally, you can glue the supports in place with construction adhesive. Slide the shelf in to see how it fits. You will likely need to trim the shelf piece down so it will fit. Once you like the fit, glue it in place with a bead of caulk on each support.
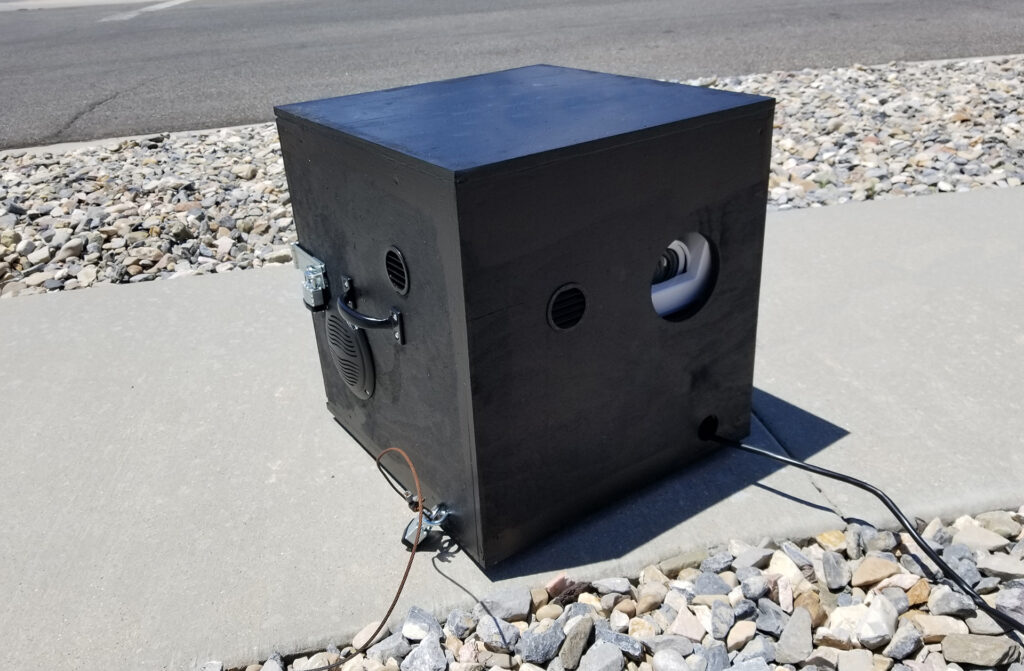
Once your shelf is in, put your projector on it and mark where the lens is. Use a hole saw to drill an opening for the lens. I used a 4.5″ hole saw for mine, but depending on how large your lens is, you may need to make it bigger. For most projectors, I measure 8 inches from the top of the box and 5″ from the right. That is the center for my projector lens hole.
You don’t want to cover the lens hole with glass or plexiglass. You will need the hole open for ventilation and the projector sits far enough inside that precipitation will rarely touch it. It will be very warm inside the box, so the few water droplets that get inside will evaporate very quickly.
At this point it is a good idea to drill a few smaller holes to facilitate even more ventilation. Take a look at the ventilation openings on your projector and you can create corresponding ventilation holes in the box in those places. Projectors run very hot, so even in the winter, your box will need ventilation! Installing a fan is also recommended. There are many types available this is the one I use.
If you want to install flush mount waterproof speakers into the sides, now is a good time to make the cutouts. A hole saw, Rotozip, or Dremel tool can do that job for you. The size of the cutouts depends on the speakers you want to install. These are the speakers I use. I use the same 4.5″ hole saw for the speakers that I use for the lens hole.
The next step is to seal all of the seams with caulk. Smooth out the caulk lines and you are ready for paint. After the paint dries you can attach the handles, rubber feet, the door with the hinges and the latch. Woo Hoo! You are done!
Securing The Box:
As you go through the process of securing the box, keep in mind that the goal is not to make the box impregnable or impossible to steal. That is just not reality. All you are trying to do is make it difficult enough to steal that a thief will think it isn’t worth it. Consider that your projection will likely get a lot of attention on your street and thieves do not like to commit their crimes where they can easily be seen doing it.
To begin securing your box, the latch you use should accommodate a lock so only you can get into the box. The presence of the lock sends a message that you don’t want anyone in there.
But somebody could still come along, grab the box, put it in the back of a truck and drive off. To prevent that, I secure mine in place with an earth anchor. I use a large metal screw eye, firmly screwed into the base of the box to provide the loop for the steel cable. Alternately, you could drill holes near the base and loop the cable through there.